So I did a slight variation on applying the padding to the dome.
I bought my pipe insulation at Home Depot and they had two types. The one to use is the one with the smoother outer surface, no roughness sort of a pebbly finish. The other is more of an open foam and can leak.
Measure around the dome just above the rim and cut the pipe insulation to this length. I cut the end straight, if you decide to bevel it, just do a few degrees. I found silicon glue to not have a strong bond with the foam (but does bond strongly with clean plastic). For this reason I looked around for another glue and selected shoe glue to glue the ends together. The instructions with the shoe glue said to wait a minute before putting the surfaces together, but this resulted in failure so on my second successful attempt I did not wait.
I bent the tubing into a circle in the fashion it would be later attached to the dome, that is with the slit up when the circle of tubing is horizontal. I applied a thin layer of shoe glue to both ends of the foam insulation and then used duct tape to hold it while the glue dried. I cut the tape into about 2cm wide strips 20cm long or more and applied 3 strips to the outside along the length of the tubing to hold the ends together. I then applied more strips of tape (this time electrical tape because it would be easier to remove later) around the tubing at the joint and also near the ends of the duct tape strips. I let this sit 24 hours for the glue to set. I then removed the tapes so it looked like this:

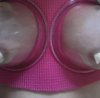
I found that the joint where I used the shoe glue to be stiff so I carefully cut a little off with scissors so it would be more comfortable when pressed against the skin. Then I fitted the tubing on to the dome, you have to stretch it a bit to get it on. You will notice that it bunches up on the inside, this has to be spread out so it fits evenly all around. I wanted to attach the inside and outside at the same height, just above the rim. Play with it a bit before removing the tape on the inside exposing the adhesive on the inside edge of the slit in the tubing. This grips instantly and very strongly so you will not get a chance to move it later. Peel the tape off the inside in short 5cm-10cm increments and press the foam on to the inside of the dome compressing the foam as evenly as you can to prevent one place from bunching up too much. The end result is a smooth flat bonding all around. I then set about filling the inside of the tube with silicon glue but decided only to fill inside the dome and not outside. I was particularly concerned about not getting any silicon on the outside of the dome where the foam would be attached on the outside.

I then removed the protective tape on the outside edge of the foam tubing and pressed it onto the dome just above the rim. At this point I tried to make sure the silicon inside the tubing was evenly distributed by feeling for any lumps and squeezing it gently to spread it around. As a final finishing touch I applied a thin layer of silicon glue (with a wet finger) at the joint of foam to dome around the inside and also on the outside. I did the same around the shoe glue joint to make it more comfortable. Note that the system is air-tight just with the adhesive bonding the foam to the dome and the silicon is primarily for comfort, not sealing. Let the silicon set for 24 hours before using.