itsjust4fun91
New Member
So, I know I took longer than I had promised on getting this thing figured out, but we had people come into our house and rip out all the duct work and insulation and replace it, which ended up taking 3 weeks instead of 4 days. I not only couldn't work on this, but couldn't pump either. It sucked to say the least. So I apologize for not getting this done sooner. Anyway on to the good news
The new padding works like a dream. I first want to point out that this wouldn't have been possible without my husband whose a gem with inventing things to fix things. This was his idea to start with and I added the silicone.
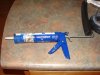
First things first this is a very easy, very cheap fix. It consist of a 4 foot length of plumbing insulation foam from lowes for 3.98, and two tubes of silicone from walmart for 4.97 each. If someone does not have a caulking gun to use the silicone tubes, then you would need to add in those cost but you can get them for a couple of bucks at lowes or walmart also.
I have tried them out and they don't leave a mark and what was pink was gone within 5 minutes with no sign of pumping. the pink area was not in the area above the breast where the domes have been leaving indents. That looked completely untouched.
I feel pretty confident that indents and red ring marks will be a thing of the past with this padding because it also changes the dynamics of the pressure that usually came along with pumping with the XL cups. There is none now. The only sensation you will feel is the tug on the breast to whatever degree you decide to pump them. You cannot feel any pressure on the upper chest or ribs. It lets the pumping only center on the pressure tug of the breast.
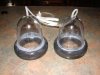
This will also help those that have problems with getting suction or holding it due to the width of the XL cups. The foam used measures 3/4 of an inch thick, but the stamp on the side says it's 1/2 inch. I'm guessing that when it's curved into shape it seems thicker than if it was layed out flat which is probably the what they go by, so look for 1/2 and the stamp says 5/8 ID X 1/2. It does compress some on the inside of the cup when you pump, but it was a breeze to get them pumped, no loss of suction when moving around at all and they stayed in place perfectly even while unloading my dishwasher. I will first post a picture of the finished product, then post a reply with the details of putting them together and more pictures.
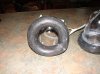
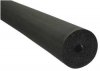
In order to make this padding you will need to get the plumbing foam insulation from a hardware store. It's cheap and comes in 5 foot sections. It also is presplit down the side so you won't have to worry about cutting the slit for the rims to sit down inside and it had a preglued inside with a plastic cover that will help you stick it to the cups. You will find it in the plumbing section sometimes on the same isle as the camping tape and other insulation products depending on how they organize their store.
You will need to fit it around the rim to get an idea of where to cut it. It's best to cut too much and slowly slice away the excess little by little until they meet nicely. Don't panic if it doesn't fit perfectly, you can fill it in with the silicone and still get your suction. And with the foam being 5 foot you do have extra for a do over.
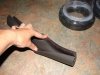
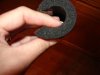
Once you have it cut to your satisfaction you will leave the foam on the rings and while holding it in place, begin to fill it pretty heavy under the rim inside the foam so that you can see the silicone rising up on both the inside and outside of the rim . I only filled mine half full inside the foam to start with so it could dry well. I then took a piece of regular scotch tape and taped a piece over where the two ends of the foam met to hold it while it dries. It could hold on it's own in about 3 hours. I let that dry overnight, then the next day removed the plastic from the preglued edges that are on the foam and finished filling the inside of the foam to cover the rim top . I then pressed the edge against the cup inside and out. if if the foam edge doesn't stick firmly to he cup don't worry, just fill it in with silicone. I used my finger and applied it heavily to each edge to hold it firmly to the cup and to seal it. after doing that I used my finger and applied a very thin coat to the entire foam ring. I only did this to ensure my lotion not messing up the foam, but it might not be required. A thin coat takes a couple of hours to dry, so I did the bottom first and sat them propped up upside down to dry, then flipped them over and did the sides and the top. I let dry for 24 hours before using them. So you are looking at roughly two days of drying time, from start to finish.
Hugs, Mel
The new padding works like a dream. I first want to point out that this wouldn't have been possible without my husband whose a gem with inventing things to fix things. This was his idea to start with and I added the silicone.
First things first this is a very easy, very cheap fix. It consist of a 4 foot length of plumbing insulation foam from lowes for 3.98, and two tubes of silicone from walmart for 4.97 each. If someone does not have a caulking gun to use the silicone tubes, then you would need to add in those cost but you can get them for a couple of bucks at lowes or walmart also.
I have tried them out and they don't leave a mark and what was pink was gone within 5 minutes with no sign of pumping. the pink area was not in the area above the breast where the domes have been leaving indents. That looked completely untouched.
I feel pretty confident that indents and red ring marks will be a thing of the past with this padding because it also changes the dynamics of the pressure that usually came along with pumping with the XL cups. There is none now. The only sensation you will feel is the tug on the breast to whatever degree you decide to pump them. You cannot feel any pressure on the upper chest or ribs. It lets the pumping only center on the pressure tug of the breast.
This will also help those that have problems with getting suction or holding it due to the width of the XL cups. The foam used measures 3/4 of an inch thick, but the stamp on the side says it's 1/2 inch. I'm guessing that when it's curved into shape it seems thicker than if it was layed out flat which is probably the what they go by, so look for 1/2 and the stamp says 5/8 ID X 1/2. It does compress some on the inside of the cup when you pump, but it was a breeze to get them pumped, no loss of suction when moving around at all and they stayed in place perfectly even while unloading my dishwasher. I will first post a picture of the finished product, then post a reply with the details of putting them together and more pictures.
In order to make this padding you will need to get the plumbing foam insulation from a hardware store. It's cheap and comes in 5 foot sections. It also is presplit down the side so you won't have to worry about cutting the slit for the rims to sit down inside and it had a preglued inside with a plastic cover that will help you stick it to the cups. You will find it in the plumbing section sometimes on the same isle as the camping tape and other insulation products depending on how they organize their store.
You will need to fit it around the rim to get an idea of where to cut it. It's best to cut too much and slowly slice away the excess little by little until they meet nicely. Don't panic if it doesn't fit perfectly, you can fill it in with the silicone and still get your suction. And with the foam being 5 foot you do have extra for a do over.
Once you have it cut to your satisfaction you will leave the foam on the rings and while holding it in place, begin to fill it pretty heavy under the rim inside the foam so that you can see the silicone rising up on both the inside and outside of the rim . I only filled mine half full inside the foam to start with so it could dry well. I then took a piece of regular scotch tape and taped a piece over where the two ends of the foam met to hold it while it dries. It could hold on it's own in about 3 hours. I let that dry overnight, then the next day removed the plastic from the preglued edges that are on the foam and finished filling the inside of the foam to cover the rim top . I then pressed the edge against the cup inside and out. if if the foam edge doesn't stick firmly to he cup don't worry, just fill it in with silicone. I used my finger and applied it heavily to each edge to hold it firmly to the cup and to seal it. after doing that I used my finger and applied a very thin coat to the entire foam ring. I only did this to ensure my lotion not messing up the foam, but it might not be required. A thin coat takes a couple of hours to dry, so I did the bottom first and sat them propped up upside down to dry, then flipped them over and did the sides and the top. I let dry for 24 hours before using them. So you are looking at roughly two days of drying time, from start to finish.
Hugs, Mel